Vue 3x3 - A Mental Model for Building Fast
Like many folks who choose Vue, I find it to be incredibly productive and it rarely gets in the way.
The recently released 2022 State of JS survey once again has some in the Vue community debating the merits of options vs composition API and whether the transition has held back Vue. I started to reflect on what aspect of Vue 3’s composition API made it so easy for me to be so productive with very little foot-gunning.
I think that my own productivity in Vue can be broken down to a simple “3x3” model that makes it easy to grasp and be productive while building applications without the need to think about “higher order” complexity that can create drag.
To better understand what I mean by that, both Nadia Makarevich and Amy Blankenship have fantastic writeups that outline some of the key road hazards to watch for when working with React that I’ve personally encountered as well on professional projects.
These types of hazards simply don’t exist in Vue because renders are “opt-in”. In Vue, one almost never has to think about side effects and over-rendering or optimizations requiring useMemo and useCallback because as Arek Nawo summarizes in his excellent and concise writeup, the fundamental difference between Vue and React is that they have inverted models of what gets (re-) rendered.
In this article, I want to outline a simple 3x3 model to understanding Vue.js to help you build better, faster, and with less foot-gunning. If you’d like to see the sample code, check out this repo: CharlieDigital/vue-3x3-tutorial
We could easily build this entire application without the state or routing part as a simple one-pager and a few lines, but our goal here is to build a foundation for bigger, more complex applications.
The 3x3 Model
The topic of Vue 3 always invokes discussions around usage of reactive vs ref vs $ref and options vs composition API. There are intricate framework capabilities that support a wide variety of use cases and builds.
This is not an article about complexity (we can’t all be as brilliant and gregarious as Anthony Fu); what we want is a simple, easy to grok mental model for the Grug-Brained Developer that lets us build 90% of applications in a fast, stable, and low fuss way.
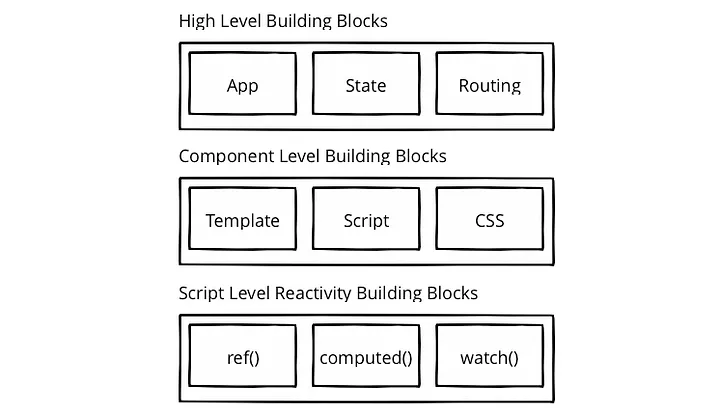
My own internal mental model of Vue is decomposed into three layers of three core concepts each or “3x3”:
- The high level building blocks: the app, the state, and the routing
- The component level building blocks: the template, the script, and the CSS
- The script level reactivity building blocks: ref, watch, and computed.
We’ll explore these concepts in the context of building a simple checklist management application, but it scales surprisingly well and it’s the same foundation I’ve used to make apps like Turas.app:
1) The High Level Building Blocks
This first layer describes how logic is organized at the application level: the app, the state, and the routing.
1.1) The App
Let’s start by creating an app:
cd code
mkdir vue-3x3
yarn create vite . --template vue-ts
yarn
This creates three files of interest (coincidence??).
Here’s our src/index.html file:
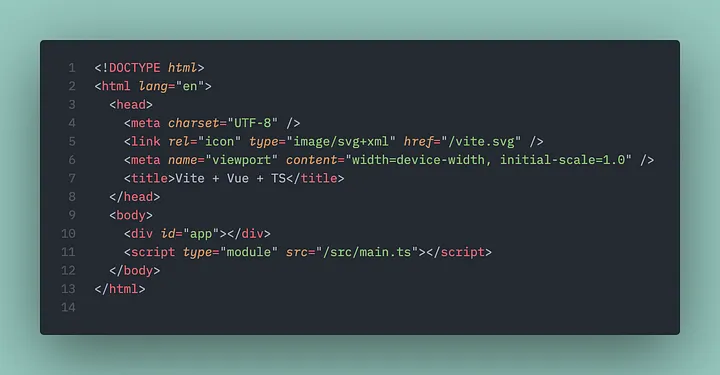 This is where out application is attached
Which loads src/main.ts:
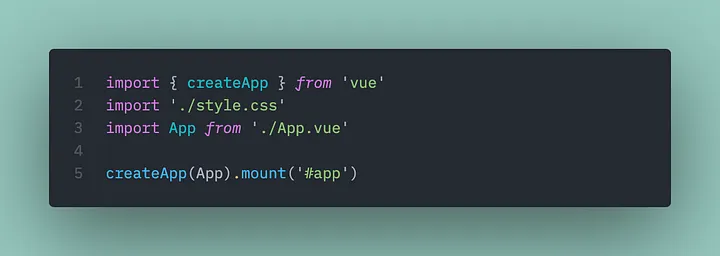 This defines the entry point for our application and is a place for global setup.
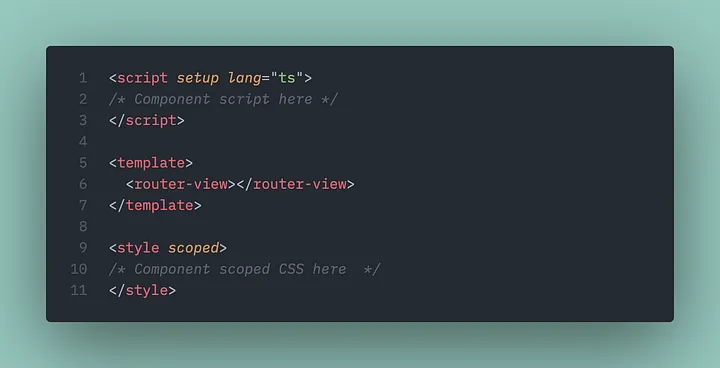
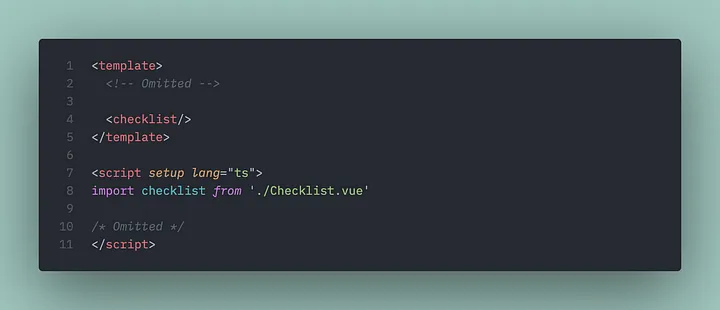
Which mounts src/App.vue to the div in index.html:
I’ve stripped out the default code so you can see the 3 core components.
We can view this app in the browser now by running:
yarn dev1.2) The State
At this stage, it’s not necessary to have global state, but beyond a prototype, you’ll find that having global state is almost always necessary to ease the pain of prop drilling (although Vue also has a provide-inject paradigm as well). In React, there are multiple models and frameworks to choose from when working with state. Some of those frameworks can also be used in Vue like nanostores or Daishi Kato’s Valtio. But Vue’s recommended state library is the excellent Pinia.
To add Pinia to our application, run the following:
yarn add piniaAnd update our application:
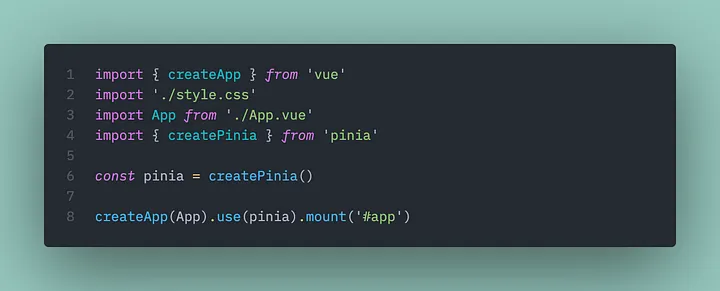
Pinia provides shared state using the concept of “stores” of which you can create as many as you’d like and recompose as needed for your application.
We’ll create a simple model and store in src/stores/appStore.ts:
 Just a single store for the state that we want to share between routes and components.
1.3) The Routing
Routing is simply mapping URLs to views and components in our application. Vue’s recommended router is Vue Router.
yarn add vue-routerWe’ll create three components (coincidence?!?!): src/pages/Login.vue, src/pages/Index.vue, and src/components/ChecklistDialog.vue (just like the empty App.vue) and plug in our routing:
 Updated App.vue to display the router’s view in the template on line 6.
For a simple application like this, we can hook up our router directly in main.ts, but let’s create a separate file under src/router/index.ts:
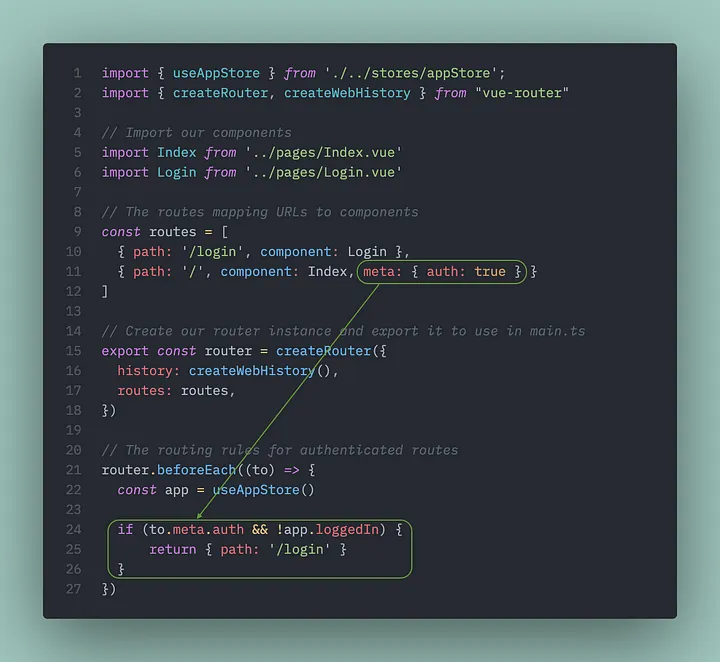 We’ve created a simple router that maps URLs to components and also defined an authentication rule so that if the route requires authentication and the user is not logged in, we will redirect to the login route.
And update our src/main.ts to load our router:
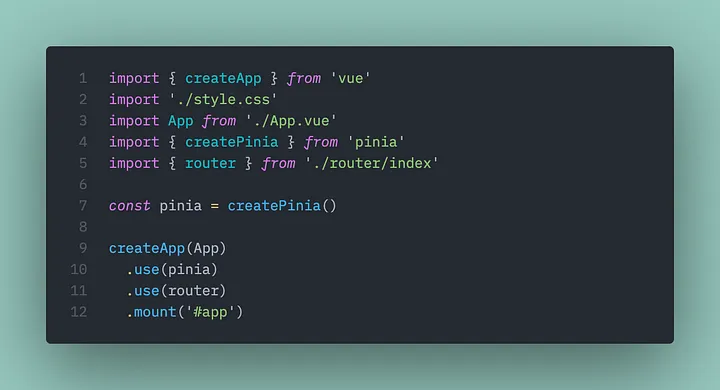 Note that we add Pinia first and then the router since we need to use the store from the router.
If we fire up our app now:
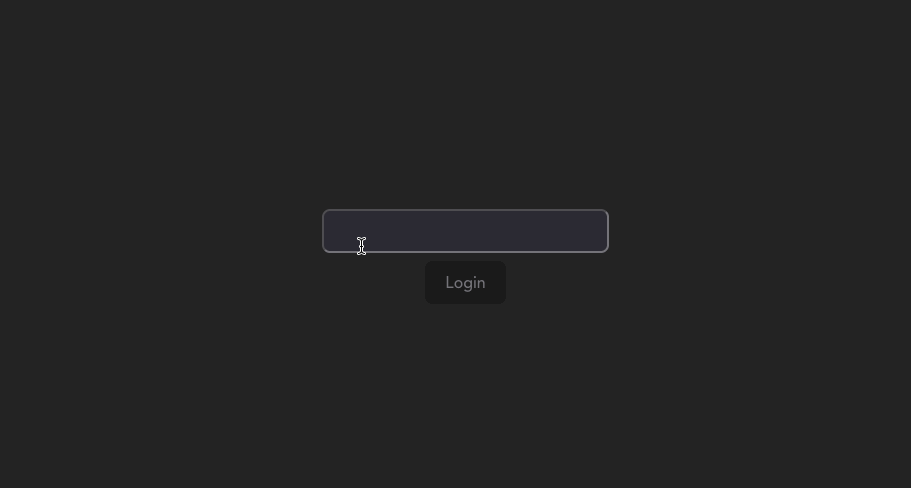
yarn devWe get our login route in the URL.
That’s the foundation of an SPA Vue application distilled to the basics.
2) The Component Level Building Blocks
We’ve already seen some of the basics, but now let’s dive into our component level building blocks: the template, the script, and the CSS.
2.1) The Template
While it is possible to use JSX/TSX with Vue, I prefer the single file component (SFC) practice of splitting the template from the logic.
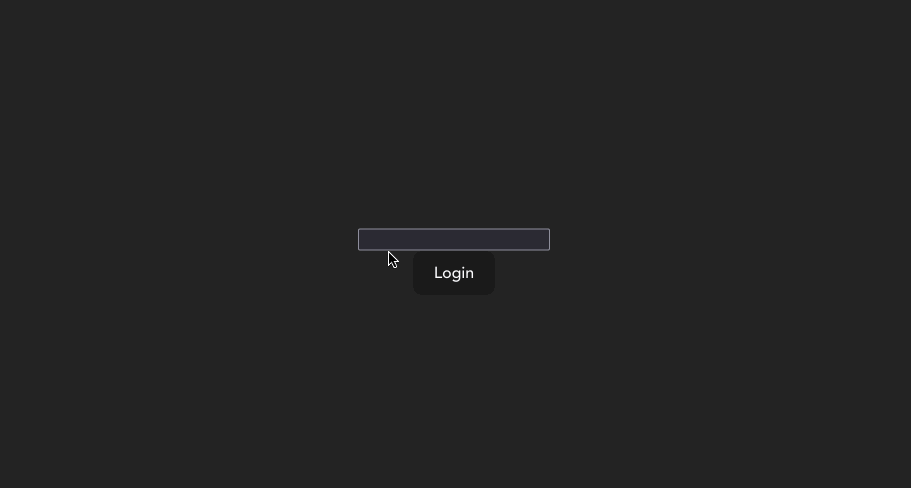
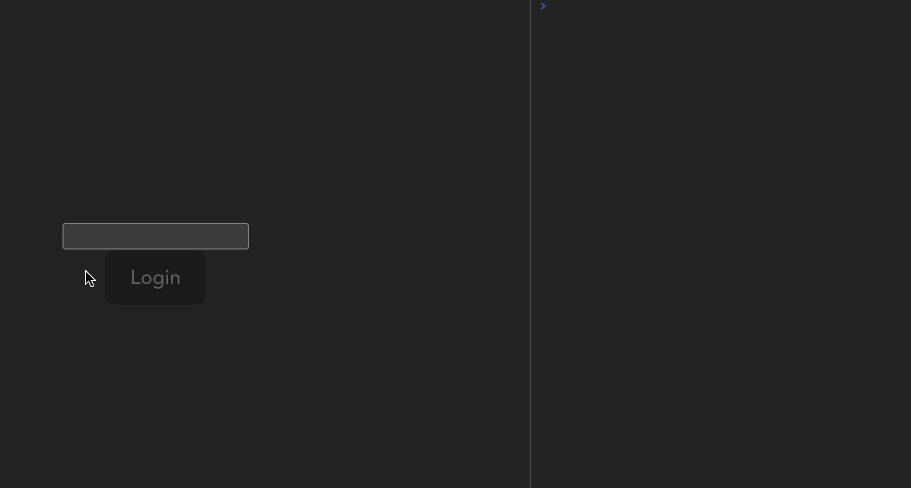
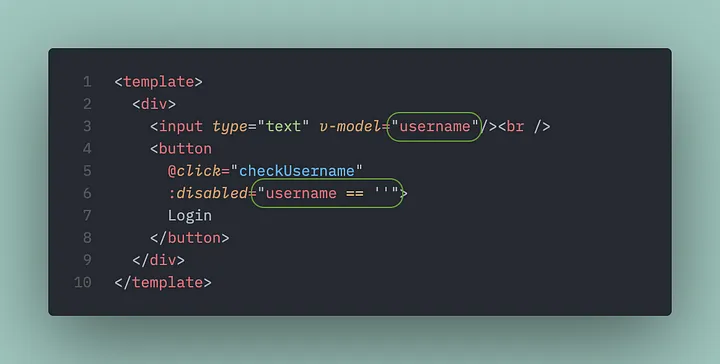
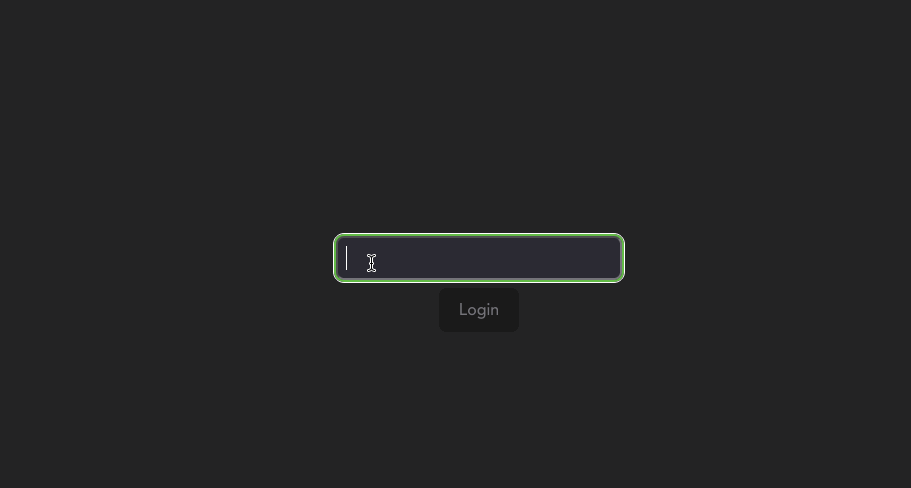
Let’s add an input for a username and a button to our login page:
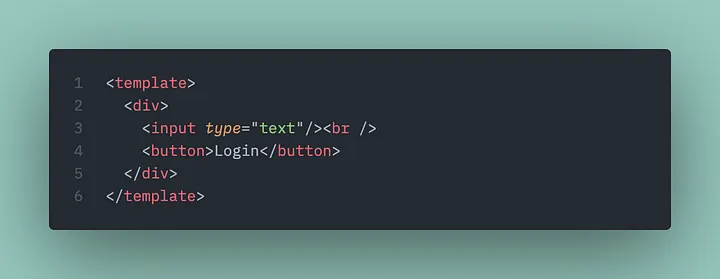
And this is what we get:
2.2) The Script
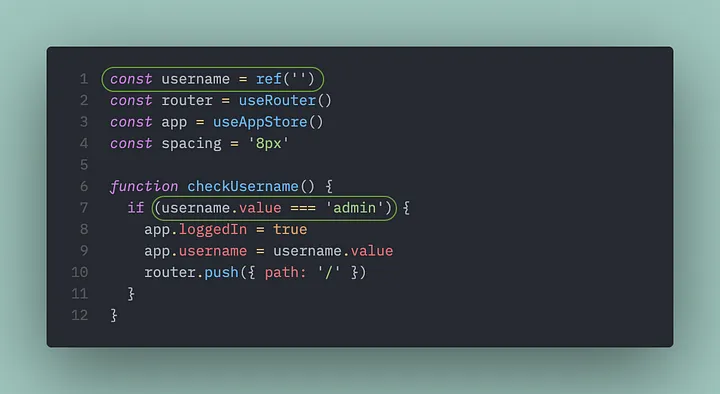
The script block is where we add our application logic. Let’s say we want to disable the login button unless the user enters a username. When the user clicks the button, we want to validate the username and route to our index page.
We need the following (once again, in 3 parts!):
- Bind the input to a property
- Bind the button state to the value of the property
- A function to route to the index page
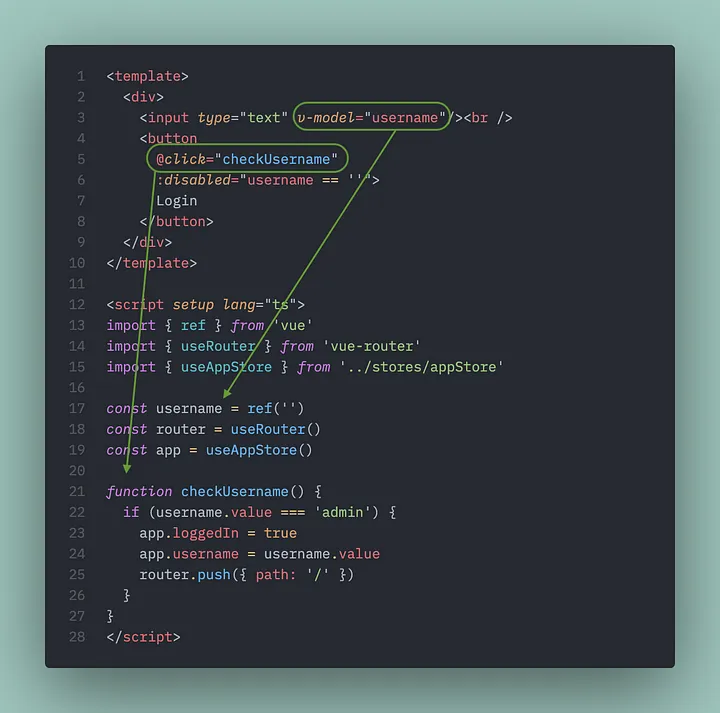 Note the simple reactive rule on line 6 that disables the button if our input is empty.
Here’s the app:
 When “admin” is entered, we route to Index.vue
What should be noted about the script block is that unlike in React, state changes do not cause a re-render of the whole component tree. Within our component the script body is only executed once.
This is a very fundamental difference between React and Vue. Here’s the same application in React (minus routing and global state):
This is a very fundamental difference between React and Vue. Here’s the same application in React (minus routing and global state):
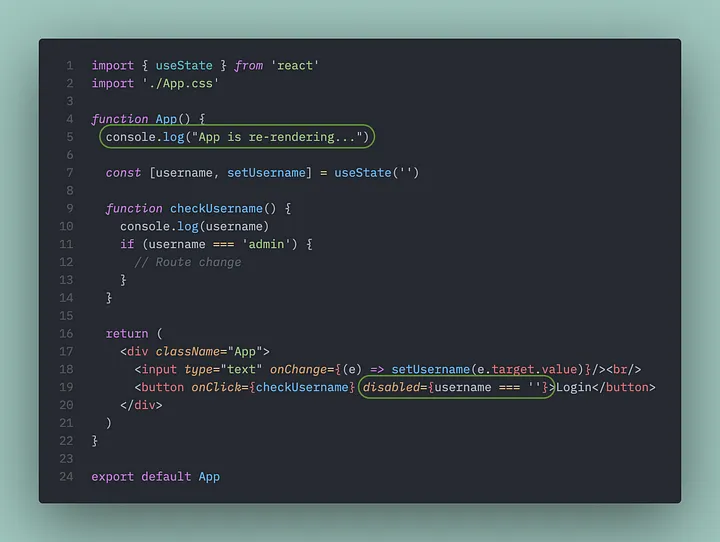 Note the console log on line 5
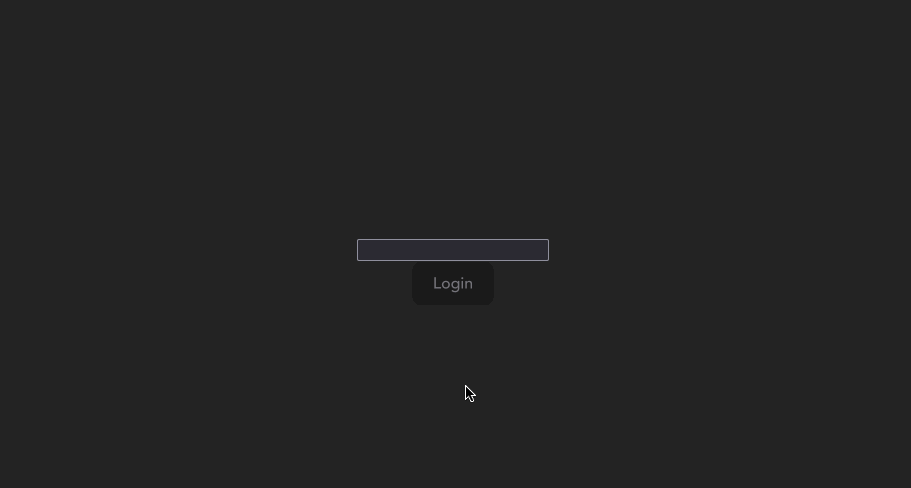
Let’s see what happens when we type in a username in the React version:
 In React, the default is that every state change will cause a component tree redraw that you need to opt out of.
The reactivity system of React is in fact conceptually “inverted” from Vue’s. The reason the disabled works on line 19 is because the entire component is reevaluated (as Amy points out in the comments, even the checkUsername function is reallocated) with the value of username now being “hydrated” from useState() each time it is invoked on re-draw. In this trivial case, it doesn’t really matter; you’ll never notice the performance difference or odd side effects caused by an errant function invocation. But as any application becomes more complex, it is imperative to understand and manage this lifecycle; the bigger the app and team, the harder it is to do this well.
If you’re new to React or Vue, Nadia Makarevich’s excellent React re-renders guide is a must read.
2.3) The CSS
In Vue, you can include CSS directly in the .vue SFC file and it can either be scoped to the component or global.
Let’s style our input:
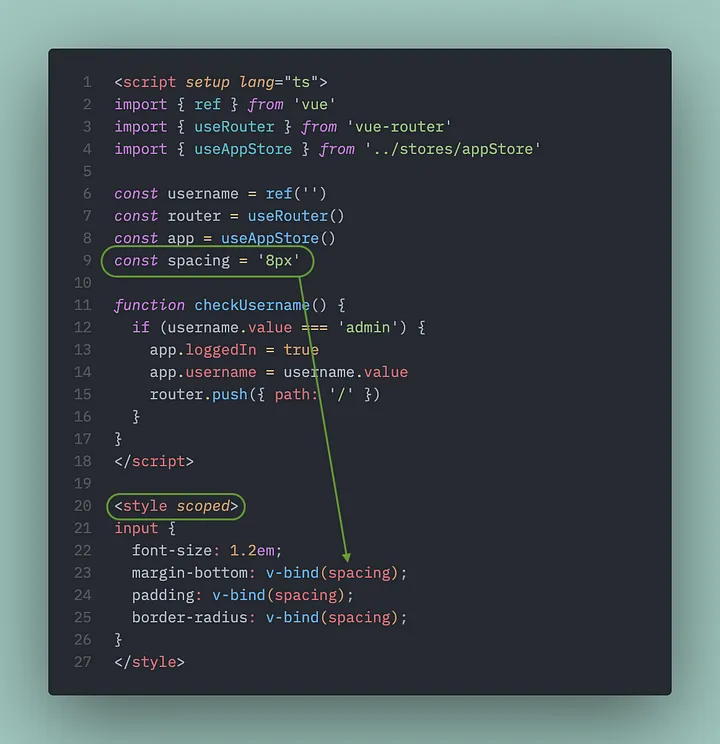 Vue’s CSS slot allows binding to runtime values.
Two things to note:
- The
scopedattribute denotes that the CSS is only scoped to this component (important: this also means down the tree as well; child components do not get scoped CSS!). - See how we can use the values from our script in our CSS? If we wanted to make this reactive, all we need to do is declare
const spacing = ref('8px')instead!
The result:
 Our newly styled input!
3) The Script Level Building Blocks
While the depths of Vue’s reactivity system can be convoluted, in general, you only need to use three primitives:
ref— we’ve already seen this in action. This is how we declare a property to be reactive.computed— this is how we create a reactive projection (think of the way Array.map or SQL’sSELECTstatement works to project a new shape).watch— this is how we can watch for changes in state and perform additional logic.
There are also reactive and the (now dropped) $ref transform, but using ref alone has never been an issue for me and I find it simpler to just not even worry about reactive vs ref vs $ref. Just use ref. (Turas.app is built entirely with only these three reactive primitives).
In the React world, directly mutating properties on objects in state is frowned upon. Consider Redux which works with immutable state that requires you to push the next snapshot of the state. So the use of spread and destructuring of state is common. But with Vue, this will generally create a bit more work since destructuring a reactive object then requires toRefs to make the properties reactive again. Personally, I find it easier to track where properties are “homed” or “rooted” by not destructuring state; in short: simplify your mental model and focus on just the 3 primitives.
The reactivity system of Solid.js in fact aligns very closely with these three primitives. createSignal = ref, createMemo = computed, and createEffect = watch. To me, it’s a testament to just how fundamental these 3 primitives are for any truly reactive presentation framework.
To help demonstrate these principles as well as state, we’ll expand our application a bit and fill out Index.vue to show our list of checklists and ChecklistDialog.vue where we can create/edit a single checklist.
3.1) Reactivity via ref()
We’ve already seen this in action. ref is the equivalent of React’s [state, setState] pair. But note that when we read or write the value, we need to use .value :
 Note the usage of
 .value to “unwrap” the reactive proxy that is created by ref.
In the template, the value is already unwrapped for us:
 Note that we don’t need to use .value in the template.
3.2) Reactivity via computed()
The easiest way to think about computed is that it is a reactive projection of our state in much the same way that a SELECT is a projection of a table or Array.map allow us to project the shape of an array of objects of one shape into an array of other shapes.
Our index page shows us a list of our checklists and we can build it like this:
 Note how we keep the state in the app instead of in the component. This allows us to access this list from any other component.
Here’s the state of our app:
 Extra credit: notice anything interesting? Our textbox to set the list name didn’t get the styles from the login page since that CSS was marked as scoped to the component.
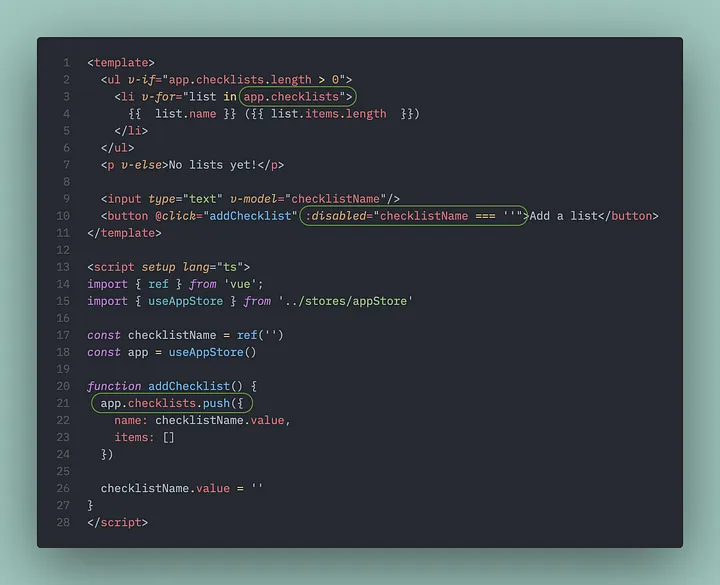
See that disabled state? What if we want to add a computation so that we only enable it if the list name is unique? What we need is a way to project a boolean from the state of our list.
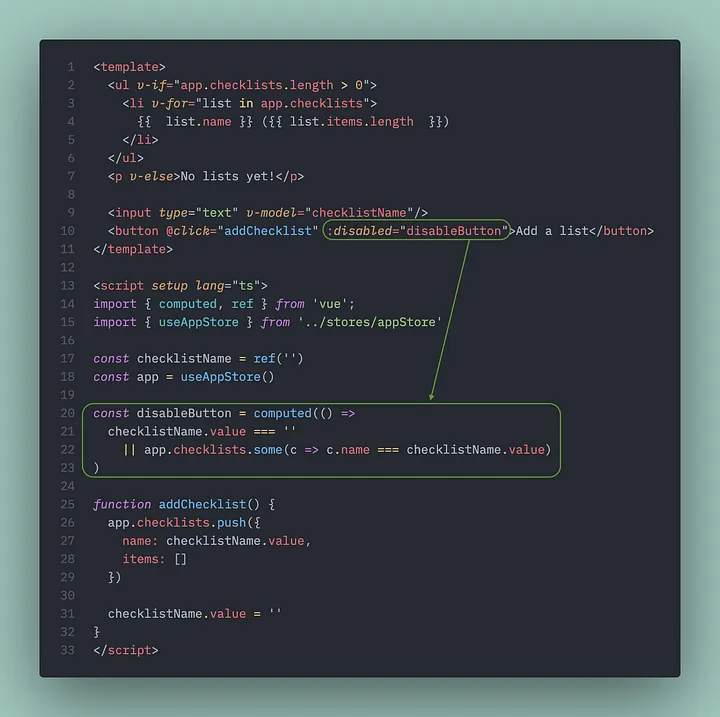 Vue automatically tracks the reactive dependencies on our behalf so the computed is also updated when the checklist name is updated; no need to explicitly define dependencies.
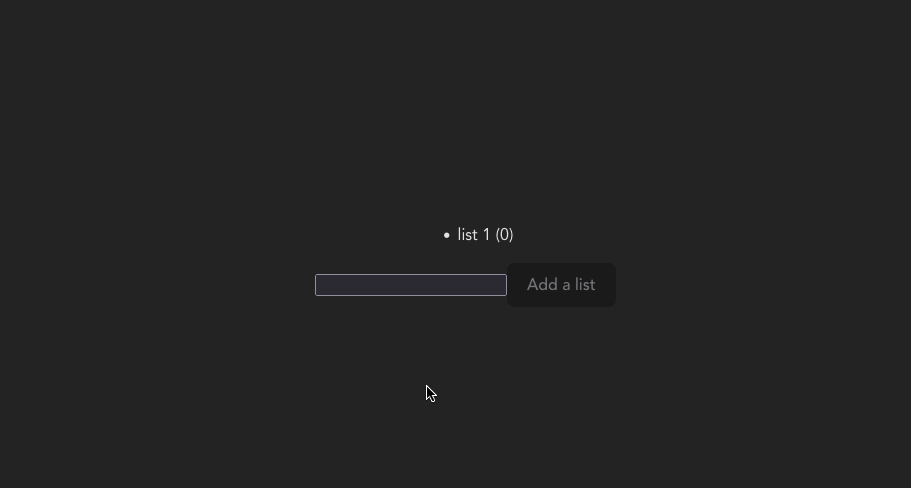
And here’s the result:
But computed is not limited to simple primitives; what if we want do display the list as a sorted and filtered list? computed again!
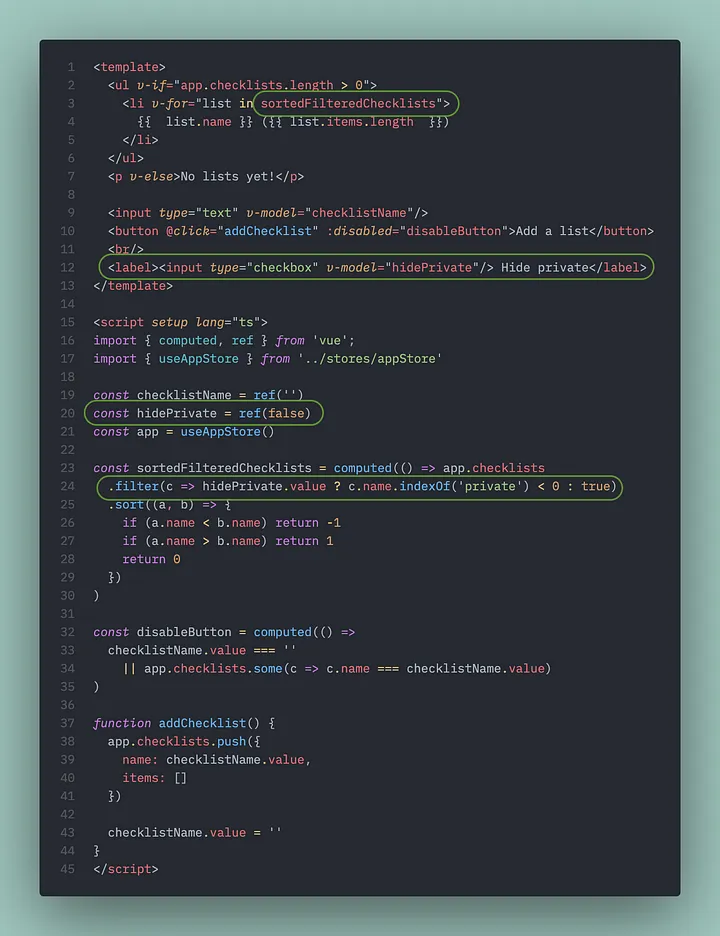
computed is like having a SQL SELECT for your UI data-binding!
Our computed list projection combines a filter and a sort operation that uses the value of hidePrivate bound to our new checkbox (line 12).
Here’s how it behaves:
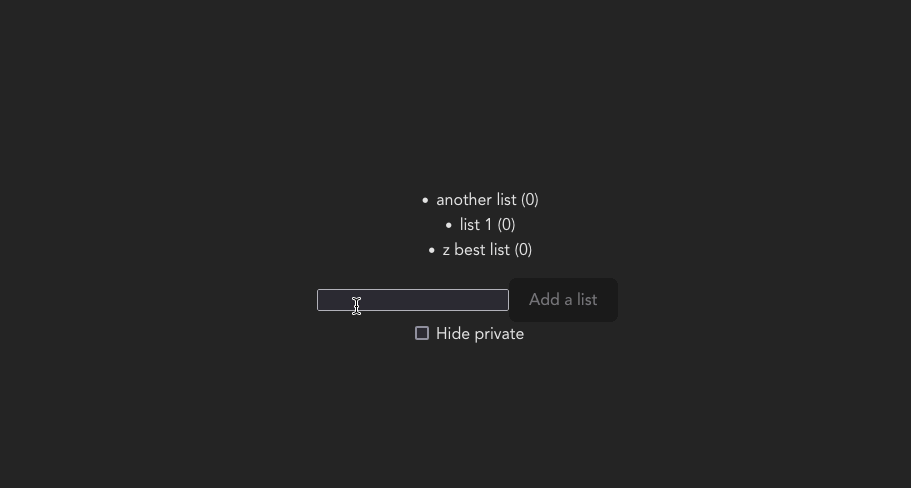 Notice how our list is sorted and we can filter out the results by whether we want to show private lists or not.
We can even refactor this and move the computed state to our store instead!
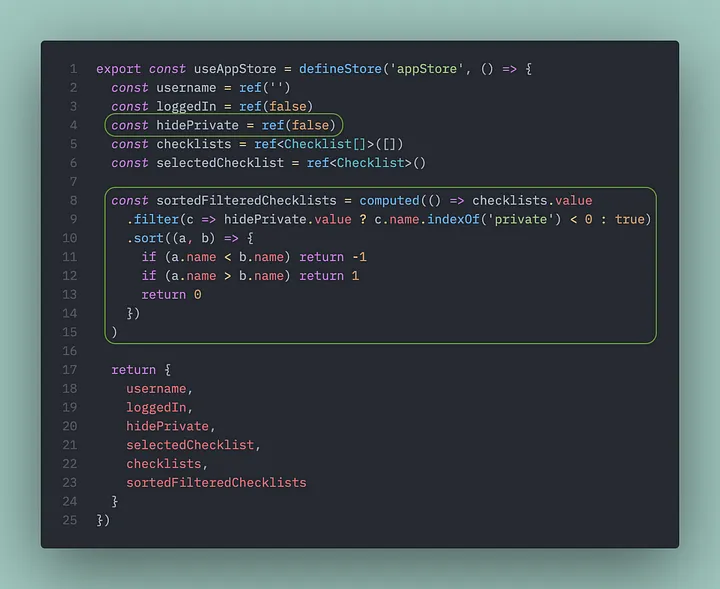 This is useful if we want to disp lay the list in other places in our app outside of this component.
What’s productive about Vue’s computed is that it automatically tracks the dependencies for us and there’s no need to explicitly define the dependencies.
3.3) Reactivity via watch()
watch lets us execute some logic when the value of what is being watched changes. This is often useful when there is a need to change the state of one component based on the change of state of a component in another part of the application or when the app needs to trigger some service call to execute.
Let’s fill out our ChecklistDialog.vue component:
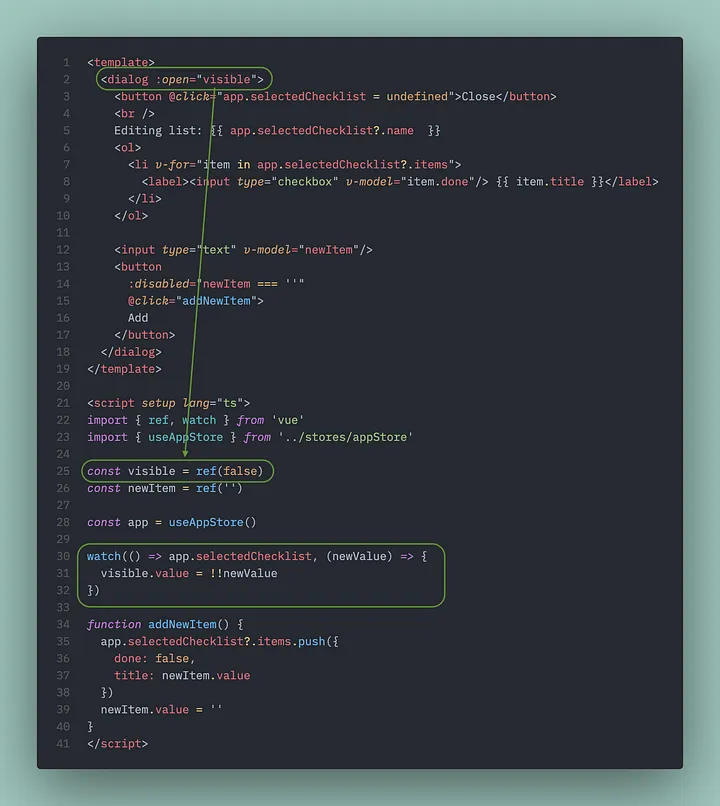 Note that the visible property controls whether out dialog is open or not. We watch for the change in the selected checklist on the app and if the value is non-null, we’ll display the dialog automatically. This way, we don’t need to pass props around.
We’re watching on the state of the app.selectedChecklist and when it is truthy, we’ll set this dialog to be open via the visible property.
And now add it to our app:
 In Index.vue
Now here’s our simple checklist app:
We didn’t need to use watch in this example strictly speaking because we can simply create visible as a computed, but watch lets us execute other code when the value changes. We could have also passed in the selected value as a prop instead, but this creates a dependency between the component that can make it difficult to refactor our component tree. With this pattern, we can move the dialog anywhere in our tree (for example, directly in App.vue at the root).
I hope that this simple “3x3” mental model helps you better understand why Vue is such a productive front-end framework to work with and why it is my framework of choice when I have the luxury of that choice. This simple model reduces much of the complexity that teams may only need in edge cases.
When combined with the excellent Quasar Framework, it provides the ability to build fast and stable applications with minimal fuss and second-order thinking required to ensure the application can scale.