Cheap and Easy Way to Scrape Sites for LLM Processing
For working with LLMs like ChatGPT, you may not need the full structure of the page; you probably just need the text content on the page. For example, if you’re running a summarization of a blog post or article.
The easiest way to extract this in your browser is to open up your devtools and type the following in the JavaScript console:
document.body.innerText Testing in the browser via dev-tools
This will return all of the text nodes in the HTML document.
💡 Note: if the page is “noisy”, you can just select the containing node for the main content and grab the
innerTextof the containing node.
To do this as an API, we can either process the document as HTML/XML and manually parse out the text nodes or use a headless browser like Playwright.
The advantage of Playwright is that it will also work with single-page-applications (SPAs) which only load the DOM after the page scripts are executed.
This makes it handy for more general purpose scraping of text content from both server-side generated pages as well as SPAs.
The goal of this walkthrough is to build a performant, easy to use REST API that we can perhaps call from OpenAI Function Calling.
Check the repo for the full code: https://github.com/CharlieDigital/playwright-scrape-api
Using Playwright
Microsoft’s Playwright is a headless browser automation tool that provides both testing and automation SDKs.
Here, we’ll be using the automation SDK to interact with a target URL. The beauty of it is that it’s dead-simple:
app.MapGet("/", async (
  [FromQuery] string url
) => {
  url = HttpUtility.UrlDecode(url);
  using var playwright = await Playwright.CreateAsync();
  await using var browser = await playwright.Chromium.LaunchAsync(new() {
    Headless = true
  });

  await using var context = await browser.NewContextAsync();
  var page = await context.NewPageAsync();
  await page.GotoAsync(url);
  await page.WaitForLoadStateAsync(LoadState.DOMContentLoaded);
  var text = await page.EvaluateAsync<string>("document.body.innerText");

  return text;
});
And in TypeScript:
app.get("/", cors(corsOpts), async (req: Request, res: Response) => {
  const url = decodeURIComponent(req.query.url as string)

  const browser = await chromium.launch({
    headless: true
  });

  const context = await browser.newContext();
  const page = await context.newPage();
  await page.goto(url);
  await page.waitForLoadState("domcontentloaded");
  var text = await page.evaluate("document.body.innerText");

  res.status(200).send(text);
})
How Do I Use It?
To run the .NET example:
cd dotnet6
dotnet run

curl http://localhost:5005\?url\=https://chrlschn.dev
And the TypeScript example:
cd typescript
tsc
node dist/index.js

curl http://localhost:8080\?url\=https://chrlschn.dev
Deploying
Ready to deploy this to use on your own? This codebase is ready to go! You can deploy easily into either AWS using Copilot or into Google Cloud using Cloud Run (basically free).
Both the .NET and TypeScript versions build on top of the Microsoft Playwright container image.
- .NET: https://hub.docker.com/_/microsoft-playwright-dotnet
- Node: https://hub.docker.com/_/microsoft-playwright
This base image is quite hefty and includes the installations of all three browsers (Chrome, Firefox, and WebKit). You can also consider using a third party image or build your own to trim down the size of the image.
Our Dockerfile for .NET:
# (1) The build environment
FROM mcr.microsoft.com/dotnet/sdk:6.0-jammy as build
WORKDIR /app

# (2) Copy the .csproj and restore; this will cache these layers so they are not run if no changes.
COPY ./playwright-scrape.csproj ./playwright-scrape.csproj
RUN dotnet restore

# (3) Copy the application files and build.
COPY ./Program.cs ./Program.cs
RUN dotnet publish ./playwright-scrape.csproj -o /app/published-app --configuration Release

# (4) The dotnet tagged Playwright environment includes .NET
FROM mcr.microsoft.com/playwright/dotnet:v1.37.0-jammy as playwright
WORKDIR /app
COPY --from=build /app/published-app /app

ENV IS_CONTAINER=true

# (5) Start our app!
ENTRYPOINT [ "dotnet", "/app/playwright-scrape.dll" ]
And for Node:
FROM mcr.microsoft.com/playwright:v1.34.0-jammy

# Create app directory in the image
WORKDIR /usr/src/app

# Copy over assets
COPY package.json ./
COPY yarn.lock ./

# Install dependencies.
RUN yarn install --immutable --immutable-cache --check-cache

# Copy source
COPY . .

# Build the TypeScript
RUN npx tsc

# Start the server.
EXPOSE 8080
CMD ["node", "dist/index.js"]
Google Cloud Run
To start with, enable the Google Cloud Run API in your Google Cloud account. For most normal use cases, this will be free since you’d have to run a lot of requests before consuming the free tier quota.
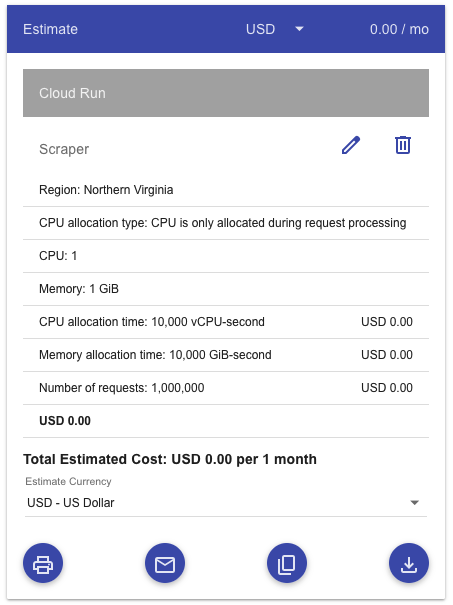 1 CPU, 1 GiB memory, 1 million requests per month at 200ms each
Use either the build-deploy-gcr.sh to build and deploy via artifact registry or use build-deploy-gcr-src.sh to build and deploy as source.
The former is faster to cycle with since you push smaller layers on changes. The later is perhaps more convenient.
# Deploy source into a Cloud Build pipeline
gcloud run deploy $gcloud_svc \
  --source=. \
  --allow-unauthenticated \
  --port=8080 \
  --min-instances=0 \
  --max-instances=1 \
  --cpu-boost \
  --memory=1Gi
Tweak these parameters for your needs, but note that this configuration will scale to zero meaning that you’ll incur no cost except when the application is handling a request. But keep in mind that the free tier quota is quite generous. You’d need to consume quite a bit before incurring costs.
AWS via Copilot
The deployment to AWS is via Copilot which will deploy the application as a ECS Fargate container. This has a bit more hoops as it requires a lot more infrastructure on the AWS side.
You’ll need to start with a one time setup of the AWS infrastructure via Copilot:
# Initialize the application
copilot init

# Initialize the environment
# Don't need the AWS_PROFILE if your default profile is non-root admin
AWS_PROFILE=profile_name copilot env init

# Deploy the environment (need an admin, non-root account)
AWS_PROFILE=profile_name copilot env deploy --name prod

# Deploy the application
AWS_PROFILE=profile_name copilot deploy --env prod
Once you’ve got it all set up, then use build-deploy-aws.sh to deploy into it.
IMPORTANT NOTES
This API endpoint isn’t secured. At a minimum — depending on how you want to use it — add a hard coded API key and pass it in via a header.