The Unexpected AI Stack: C# + .NET (Part 4)
Summary
- An effective testing strategy is part of the scaffolding for a foundational codebase that allows agents to operate with guardrails and checks.
- Testcontainers and automatic test-scoped transactions allow agents to write and execute database level integration tests in a stateless manner with isolation and parallelism.
- To help short circuit per-run agent discovery of how to operate the test harness, we interactively produce a skill with the agent on how to use write and operate the test infrastructure.
- Part 1 will introduce two under-the-radar components of the .NET stack that make it surprisingly amenable to building software with agents: Aspire and
CSharpRepl. - Part 2 will dive into a hands-on implementation from the ground up to scaffold an open-source template for teams to build on top of.
- Part 3 will implement the next layer of the application including a simple streaming interface to the Copilot SDK agent.
- Part 4 (👈 you are here) will extend the application with Testcontainers to demonstrate how to simplify test execution for agents with stateless containers.
- Part 5 will configure the application with logging, telemetry, and observability before diving into building the actual application using your coding agent.
The full repo: https://github.com/zeeq-ai/zeeq-tmpl/tree/feat-part4-Part-4-code-changes (note the branch; see the PR for the diff)
What we’re building
The previous part of this series walked through the construction of an AI enabled application that connects a web-based chat frontend to an instance of the Copilot Agent via the SDK that allows us to work with the codebase from any web API. This can be a foundation for building your own collaborative agent meta-harness on top of a model agnostic agent harness.
The exercises have already walked through examples of how to leverage Aspire and CSharpRepl, but the focus for this series is still on understanding the mechanical scaffolding that a platform team has to undertake to build a solid foundation for an agentic engineering team to accelerate. The posts intentionally focus on how to build each piece and how the pieces are connected together as these are the core components of a platform.
There are two major pieces left to scaffold before we let loose with agents. In this part, we’ll scaffold the testing infrastructure which will let the agents verify their code using a stateless containerized database and transaction rollback to ensure that the tests are isolated. In the next part, we’ll add logging, telemetry, and observability to the application so that we can see what the agents are doing in real time.
Scaffolding for storage
For local use, SQLite or even the local file system are suitable for storing the user specifications, but to demonstrate how to use Postgres and Testcontainers, we’ll add a Postgres database to the application.
Adding database access to the application
First is to add the packages necessary to connect to Postgres and set up the connection string
cd src/server
dotnet add package EFCore.NamingConventions
dotnet add package Microsoft.EntityFrameworkCore.Design
dotnet add package Microsoft.EntityFrameworkCore.Relational
dotnet add package Npgsql.EntityFrameworkCore.PostgreSQL
The Entity Framework Core DbContext is first:
// src/server/Data/ZeeqContext.cs
using Microsoft.EntityFrameworkCore;

namespace Zeeq.Tmpl;

public class ZeeqContext(DbContextOptions<ZeeqContext> options) : DbContext(options)
{
    protected override void OnModelCreating(ModelBuilder modelBuilder)
    {
        // 👇 Applying the entity configurations only from this assembly; modify as needed
        modelBuilder.ApplyConfigurationsFromAssembly(typeof(ZeeqContext).Assembly);
    }
}
And add this into the DI container at setup:
// src/server/Program.cs

// 👇 This will be injected by Aspire when we connect the resources
var connectionString = Environment.GetEnvironmentVariable("ConnectionStrings__zeeq");

// Set up the database context
builder.Services.AddDbContext<ZeeqContext>(options =>
    options
        .UseNpgsql(connectionString)
        .EnableDetailedErrors(true)
        .EnableSensitiveDataLogging(true)
        .UseSnakeCaseNamingConvention()
);
Setting up the model
Now we’ll set up the model for storing the specifications:
// src/server/Data/Models.cs
using System.ComponentModel.DataAnnotations;
using Microsoft.EntityFrameworkCore;
using Microsoft.EntityFrameworkCore.Metadata.Builders;

namespace Zeeq.Tmpl;

/// <summary>
/// A pure domain model class for storing the specification
/// </summary>
public class Specification
{
    public Guid Id { get; set; }

    [MaxLength(255)] // 👈 Note the validators here
    public string Name { get; set; } = string.Empty;

    [MaxLength(10000)]
    public string Content { get; set; } = string.Empty;
    public long TokenCount { get; set; }
    public DateTime CreatedAtUtc { get; set; } = DateTime.UtcNow;
    public DateTime? UpdatedAtUtc { get; set; }
}

/// <summary>
/// The database storage configuration for the model.  This is separated from the
/// pure domain model and represents the storage mapping for the ORM.  When scaling
/// the codebase, this can be placed with a dedicated DB project instead of in the
/// same codebase
/// </summary>
public class SpecificationConfiguration : IEntityTypeConfiguration<Specification>
{
    public void Configure(EntityTypeBuilder<Specification> builder)
    {
        builder.HasKey(s => s.Id);
        builder.Property(s => s.Name).IsRequired();
        builder.Property(s => s.Content).IsRequired();
        builder.Property(s => s.TokenCount).IsRequired();
        builder.Property(s => s.CreatedAtUtc).IsRequired();
        builder.Property(s => s.UpdatedAtUtc);
    }
}
Setting up Postgres in Aspire
To add Postgres into the stack, we’ll add a new resource using the Aspire CLI:
# From root to add the Postgresql package to /host
aspire add postgresql
After adding this, we can add the resource to the stack:
// host/AppHost.cs

// Add the resource first
var username = builder.AddParameter("username", "zeeq", secret: true);
var password = builder.AddParameter("password", "P@ssw0rd", secret: true);
var postgres = builder
    .AddPostgres("postgres", userName: username, password: password)
    .AddDatabase("zeeq")

// Wire it to the backend resource so it gets the connection string
var backend = builder
    .AddProject<Projects.server>("app-backend")
    // 👇 Wire up CSharpRepl environment variables to the runtime.
    .WithEnvironment("DOTNET_STARTUP_HOOKS", csrHook)
    .WithEnvironment("ASPNETCORE_HOSTINGSTARTUPASSEMBLIES", "CSharpRepl.InjectedHook")
    // 👇 Connect the postgres instance
    .WithReference(postgres);
After we wire up Postgres to the backend, Aspire automatically injects the connection string into the backend as an environment variable.
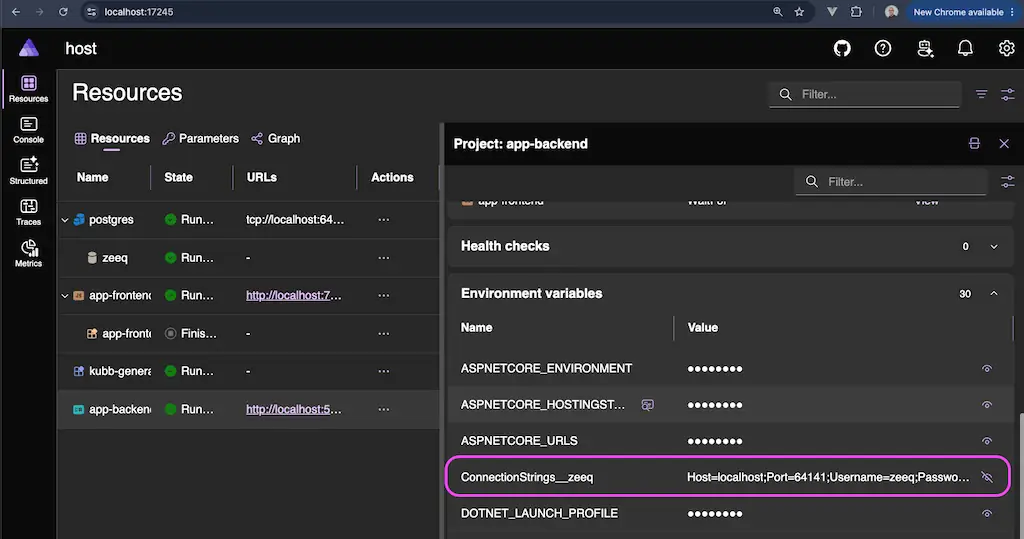 Here, we can see Aspire wires the resources together by injecting the connection string into the backend as an environment variable.
Create the database migration
Before moving on, we’ll create the database migration that will be needed by the test fixture in the next section.
cd src/server
dotnet ef migrations add Zeeq_Planner_Init
Our database scaffolding is ready; next is to scaffold the test infrastructure that we need to allow agents to run integration tests in an isolated manner using Testcontainers.
Adding Testcontainers for integration testing
For testing the application, we’ll add a new test project with Testcontainers and TUnit.
Adding the Testcontainer and TUnit packages
We’ll add the packages and add a smoke test to ensure that everything is working and wired up:
cd src
mkdir tests
cd tests
dotnet new console
dotnet add package TUnit
dotnet add package Testcontainers.PostgreSql
dotnet add reference ../server
mv Program.cs SmokeTest.cs

cd ../../
dotnet sln add src/tests
In global.json, we’ll need to instruct the runtime that we’re using Microsoft Testing Platform (MTP) mode:
// global.json
{
  "sdk": {
    "version": "10.0.302",
    "rollForward": "latestFeature"
  },
  "test": {
    "runner": "Microsoft.Testing.Platform"
  }
}
Add a smoke test:
// src/tests/SmokeTest.cs
public class SmokeTest
{
    [Test]
    public async Task TestSmoke()
    {
        await Assert.That(true).IsTrue();
    }
}
Now we can run the test:
dotnet test

Test run summary: Passed!
  total: 1
  failed: 0
  succeeded: 1
  skipped: 0
  duration: 717ms
Wiring up a database fixture and transaction rollback
Before we let the coding agent loose to build the backend, we’re going to manually scaffold the Testcontainer test fixture and also set up the transaction rollback so that integration tests remain isolated.
First up is setting up the Testcontainer:
// src/tests/PgDatabaseFixture.cs
using DotNet.Testcontainers.Builders;
using Microsoft.EntityFrameworkCore;
using Testcontainers.PostgreSql;
using TUnit.Core.Interfaces;
using Zeeq.Tmpl;

/// <summary>
/// TUnit fixture for setting up the Postgres Testcontainer database
/// </summary>
public class PgDatabaseFixture : IAsyncInitializer, IAsyncDisposable
{
    /// <summary>
    /// The container instance for this fixture.
    /// </summary>
    private PostgreSqlContainer? _container;
    private DbContextOptions<ZeeqContext> _options = null!;

    private DbContextOptions<ZeeqContext> EnsureOptions()
    {
        if (_container is null)
        {
            throw new InvalidOperationException("Postgres container is not initialized.");
        }

        _options ??= new DbContextOptionsBuilder<ZeeqContext>()
            .UseNpgsql(_container.GetConnectionString())
            .EnableDetailedErrors(true)
            .EnableSensitiveDataLogging(true)
            .UseSnakeCaseNamingConvention()
            .Options;

        return _options;
    }

    public ZeeqContext CreateContext() => new(EnsureOptions());

    public async Task InitializeAsync()
    {
        // 👇 Initialize the Postgres container
        _container = new PostgreSqlBuilder("postgres:18")
            .WithPortBinding(5432, true)
            .WithPassword("password")
            .WithUsername("username")
            .WithDatabase("zeeq")
            .WithWaitStrategy(
                Wait.ForUnixContainer()
                    .UntilMessageIsLogged("database system is ready to accept connections")
                    .UntilInternalTcpPortIsAvailable(5432)
            )
            .WithAutoRemove(true)
            .Build();

        await _container.StartAsync();

        // 👇 Run the migrations to set up the database schema
        using var context = new ZeeqContext(EnsureOptions());

        await context.Database.EnsureCreatedAsync();
    }

    public async ValueTask DisposeAsync()
    {
        if (_container is not null)
        {
            await _container.DisposeAsync();
        }

        GC.SuppressFinalize(this);

        await ValueTask.CompletedTask;
    }
}
This will create one container per test project (only one in this case) and can help scale test execution throughput.
To wrap the tests with a transaction, we’ll use a base class that has two methods that wrap the execution of each test method:
// src/tests/PgTransactionalTestBase.cs
using Microsoft.EntityFrameworkCore.Storage;
using Zeeq.Tmpl;

/// <summary>
/// A base class that provides access to creating a context and transaction scoping
/// around the operation.
/// </summary>
public abstract class PgTransactionalTestBase(PgDatabaseFixture pg)
{
    private IDbContextTransaction? _transaction;

    // 👇 Each test instantiates a new class instance so we can use class-level state
    protected ZeeqContext _context = pg.CreateContext();

    [Before(Test)] // 👈 Start a transaction before the test
    public async Task Before()
    {
        _transaction = await _context.Database.BeginTransactionAsync();
    }

    [After(Test)] // 👈 Roll it back so nothing is committed to state
    public async Task Cleanup()
    {
        if (_transaction != null)
        {
            await _transaction.RollbackAsync();
            await _transaction.DisposeAsync();
        }

        await _context.DisposeAsync();
    }
}
Now our test classes inherit from this base class and every test is wrapped in a transaction that is rolled back after the test completes.
A basic CRUD test to make sure everything is working:
// src/tests/SpecificationTests.cs
using Microsoft.EntityFrameworkCore;
using Zeeq.Tmpl;

// 👇 Wire the fixture and forward to the base class
[ClassDataSource<PgDatabaseFixture>(Shared = SharedType.PerTestSession)]
public class SpecificationTests(PgDatabaseFixture pg) : PgTransactionalTestBase(pg)
{
    [Test]
    public async Task Specification_Basic_WriteRead()
    {
        _context.Set<Specification>().Add(new() { Name = "Test Spec" });

        await _context.SaveChangesAsync();

        _context.ChangeTracker.Clear(); // 👈 Clear EF change tracking and reload from DB

        var spec = await _context.Set<Specification>().FirstOrDefaultAsync();

        await Assert.That(spec).IsNotNull();
        await Assert.That(spec!.Name).IsEqualTo("Test Spec");
        await Assert.That(spec.Id).IsNotEqualTo(Guid.Empty); // 👈 Set on write
    }
}
Now if we run dotnet test:
Test run summary: Passed!
  total: 2
  failed: 0
  succeeded: 2
  skipped: 0
  duration: 3s 198ms
Looks good!
Training the agent to use the test harness
By default, the agent will try to use XUnit commands because TUnit is a relatively newer framework with less representation in the model training. Additionally, the Microsoft Testing Platform (MTP) is also a relatively new test runner that is not as widely represented in the model training.
To help the agent understand how to run the tests, we’ll go through the same exercise as before with CSharpRepl and guide the agent through some experiments with some starting points for it to read so it can materialize a skill for testing.
<!-- Give it some basics about TUnit and specifically mention MTP -->
We are working on writing a skill in .agents/skills/unit-integration-testing/SKILL.md for .NET and C# code
Our goal is to keep this skill short, terse, to the point with key examples broken down into sections.
The test project is in src/tests using TUnit (NOT XUnit) and Microsoft Testing Platform
See: https://tunit.dev/docs/execution/test-filters
See: https://tunit.dev/docs/assertions/getting-started
See: https://tunit.dev/docs/migration/xunit
See: https://tunit.dev/docs/reference/command-line-flags
Write a quick introductory section and then a table of the key basic commands.
When done, I'll prompt the next experiment

<!-- Document key assertion patterns -->
Document the key assertion patterns supported by TUnit
See: https://tunit.dev/docs/assertions/exceptions
See: https://tunit.dev/docs/assertions/combining-assertions
See: https://tunit.dev/docs/assertions/equality-and-comparison
When done, I'll prompt the next experiment

<!-- Specifically call out the PostgresDbFixture and transactional behavior -->
See: PgDatabaseFixture.cs, PgTransactionalTestBase.cs to understand how the test database is set up
Document a bullet list of notes for the test scaffolding that is relevant to understanding how to write integration tests
Capture information about test isolation behavior for integration tests that touch the database
When done, I'll prompt the next experiment

<!-- Now have it run a filtered test (if it did not already produce this) -->
Use treenode filters to select a single test file to run
Use treenode filters to select a single test method to run
Document your findings and fill any gaps in the document
When done, I'll prompt the next experiment

<!-- Add instructions for how to write good tests -->
Document best practices for writing good tests:
- High signal, low noise
- Focus on invariants
- Use class-level setup for shared resources; each test runs as class instance
- Use three part naming convention for test methods: EntityOrScopeName_StateUnderTest_ExpectedBehavior
We’ll add a short note in AGENTS.md for both the CSharpRepl skill as well as the test skill.
<!-- AGENTS.md -->
## Skills

- Use the skill `unit-integration-testing` when writing and running .NET C# tests
- Use the skill `csharprepl` to directly manipulate the running C# application, wrap methods, replace methods, and inspect the runtime state of the application
This way the agent knows exactly when to use these two skills.
Closing thoughts
This stage of the exercise continues to focus on the key choices that human operators need to make when scaffolding the foundational codebase that agents will code on top of. Because these decisions will ultimately affect correctness, iteration speed, and operational runtime correctness, each one has been made intentionally to understand the guardrails that are in place to help agents work effectively.
Testcontainers and transaction rollback are a key part of this by providing parallelism for large projects as well as test isolation. Using Aspire and EF Core, it’s easy to wire together a fully type-safe data layer with a domain model isolated from the underlying storage mapping.
In the last and final part, we’ll wire up logging, telemetry, and observability to the application and build the final specification writing surface that will allow the agent to give continuous feedback on the specification as it runs research on the underlying code as the specification is being written.
If you are curious to see a real-world setup, check out the Zeeq.ai repo: https://github.com/zeeq-ai/zeeq-app
Still human written (mistakes and all!); see the file history in the repo.